August 24, 2021

Pine Hollow Peak via Pine Hollow Trailhead

 The Trail

This moderate trail is 4.5 miles long with about a 1700 foot elevation change. While there are actually multiple ways to reach Pine Hollow Peak, we started from the Pine Hollow Trailhead near Mutual Dell. You can also start from Salamander Flat, from the northern most curve in the Alpine Loop after Mutual Dell seen in the map below, or even coming from north of the peak by starting at Tibble Fork Reservoir if you are up for a very steep trail.

Topographical Map

Graph of Elevation

Trail in Google Earth

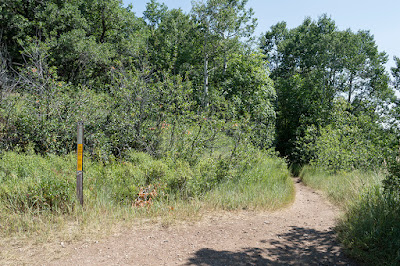
The trail starts from a large parking lot with a trail system map and vault toilet next to the start of the trail. Soon after the trail crosses the road, the trail splits with the left trail heading down and around to Mutual Dell Campground. Go right here to head up the mountainside at a gradual incline.

Trailhead

Trail heading up the mountainside

About 1.3 miles up the trail, hikers will come to a split for the Salamander Flat Campground. Stay on the Pine Hollow Trail (047) to continue up to the peak. The trail will start to open up in places and transverse through some lush meadow areas.

Salamander Flat Trail Split


The trail continues east for another 0.7 miles before intersecting with the Ridge Trail (157). Take a sharp left here to head in a more northerly direction. This is a beautiful meadow area that had an abundance of wildflowers while we were there. If you start the trail at the northern most point of the Alpine Loop after the Mutual Dell Trailhead that just shows at the bottom of the above maps, then you will be starting on the Ridge trail and come up to this intersection, making your hike much shorter.


 The trail veers west after a ways, and about 0.7 miles from the Ridge Trail intersection, the trail will start to descend for about a quarter mile before it reaches a split (marked by the green flag in the topographical map) for the Mud Trail (173). The Ridge Trail here turns off to the northeast, whereas the Mud Trail (173) will pass by Mud Spring shortly after this point. Continue left along the Mud Trail.

Mud Springs Split

Mud Spring


Another 0.7 miles up the trail from this point (3.5 miles up from the Mutual Dell Trailhead), there is one more trail split, but this one is not marked or labeled. The Mud Spring Trail continues north here and starts to descend, whereas the trail toward the peak heads west and continues to ascend the mountain. Turn left here to continue toward the peak.

Turn left here to ascend toward the peak

From here there is about one more mile until the peak. However, the best view point is not from the peak, but from a nice overlook on your way there, marked by the camera on the topographical map.

Nice view of Mount Timpanogos from viewpoint along trail

The peak itself is only an easy 0.3 miles after the viewpoint, but it is rather anticlimactic as the trees block most of the view from it. It is little more than a small pile of rocks.

Pine Hollow Peak

The trail does continue down from here quite steeply toward Tibble Fork Reservoir, shown in red on the maps above. The trail is pretty slick as well here.

We just returned the way we came up. Please note that this trail is open to bicycles, motorbikes, and horses. Even going on a day in the middle of the week, we ran into all of those, so be careful and respectful on the trail. Dogs are also permitted on this trail. There is a fee to access American Fork Canyon and the Alpine Loop.

Directions

This trail is located in Utah County along the Alpine Loop up from American Fork Canyon. To get there from south of American Fork, take I-15 to Exit 275 and turn right onto Pleasant Grove Blvd. Turn left shortly after that onto 2000 W/Country Blvd. and continue north to 11000 N. Continue up this road and into American Fork Canyon, paying the fee at the fee station. Stay right where the road splits part way up the canyon. You will continue for about 6.6 miles past the fee station before reaching the trailhead on the right.

Alternatively, if you are coming from the north, take Exit 283 for Triumph Blvd, merge onto Thanksgiving Way, and then turn left onto Triumph Blvd. Continue to UT-92, turn right onto this road, and continue east to American Fork Canyon. Pay the fee at the fee station before continuing up. Stay right where the road splits part way up the canyon. You will continue for about 6.6 miles past the fee station before reaching the trailhead on the right. GPS Coordinates: N40° 27.009' W111° 38.624'


August 03, 2021

Ogden Canyon Overlook Trail

The Trail

This moderate 2.8 mile (one way) trail has about a 890 ft. elevation change. The trail starts in Snowbasin and follows a dirt road for a ways before turning into a narrower hiking/bicycling trail as it continues to the overlook.


Topographical Map

Graph of Elevation

Trail in Google Earth

This trail starts at a metal gate and heads north along the wide dirt road on the other side. It actually starts with a slight descent for almost a half mile before changing to and uphill incline. There are a number of smaller side trails heading off from this main dirt road, but to go the right way, stay on the wide road. There are lots of meadows and a little pond along the way.

Trailhead


About 0.6 miles up the trail there is another clearly labeled trail off to the right. This trail is part of a loop option for Sardine Peak that is about 7.5 miles long as is popular for bicyclers, though it is more popular to come down this part of the trail than go up it.

Trail intersection for Sardine Peak Loop

A little ways further up the trail there is a meadow area that used to be part of the Maples Campground before it was abandoned. Campers can still hike in and stay in the area away from the trail, but there are no services. Stay in a northerly direction here and you will come to a split in the road where it actually just loops around. Turning left is shorter, but either option will take you to the original trailhead at the other side of this loop.

Open meadow/former Maples Campground where the road
splits for a loop

After hiking about 0.8 miles from the metal gate, you will come to this trailhead next to a picnic bench, marked by the trailhead sign on the topographical map above.

Trailhead

Picnic Bench at Trailhead

The trail becomes much shadier here as it makes its ways through mostly arboraceous areas.

After another 1.4 miles up, the trail splits again with a well marked option to go up toward Sardine Peak or to head out to Ogden Canyon Overlook. For the overlook, head left here.

Looking toward Sardine Peak at the trail split

Head up a couple long gradual switchbacks before arriving at the lookout.

Switchbacks

 The outlook itself offers a nice view of Ogden Canyon and the surrounding mountains. Sardine Peak remains visible to the northeast. A handy bench offers a nice resting spot before heading down or continuing your journey.

View from the Overlook

Sardine Peak to the Northeast

Directions

This trail is located in Weber County, Utah in the Snowbasin area. The shortest fastest way to get there will vary some depending on the direction you are coming from. If you are coming from the south, it works best to take Hwy 89 until it comes up and connects with Hwy 84. However, if you are coming from directly west of Hwy 84 or from north of it, you can just start on Hwy 84 or exit onto it from I-15. Take Hwy 84 up the canyon to Exit 92. Turn left to get to UT-167/Old Highway Rd., and then turn right and continue along UT-167, turning left at the Sinclair Gas station to stay on the right road. Turn left at UT-226/Snowbasin Rd. Continue up the road before turning left again toward the Snowbasin Lodge/Maples Campground Access Rd. Continue along this road without taking any other left turns and you will arrive at the trailhead gate. There is parking along the street here with other parking available in the adjacent lots. GPS Coordinates: N41° 13.112' W111° 51.783'

July 23, 2021

Holbrook Canyon Trail

The Trail

We didn't make it to the end, but the portion of this pleasantly shady moderate trail we did transverse was 3.1 miles long (one way) with about a 1,508 ft elevation change. Hikers are supposed to be able to reach the ridge to the east from this trail, but some say that the trail is extremely difficult to follow that far and nearly disappears. I have read elsewhere though that it is about 5 miles to the ridge. We found the trail overall became rougher and more overgrown as we went, but it was still clear at the point at which we turned around. Pants are recommended.

Topographical Map

Graph of Elevation

Trail in Google Earth

The trail starts at the south end of the parking lot and is clearly labeled. The trail at the north east side of the lot is the North Holbrook Route Trail, so unless that is the trail you are looking for, don't take that one. 

Sign at front of parking lot

Sign marking the Holbrook Canyon Trail


The Holbrook Canyon trail starts with a descent through an opening in a chain link fence. At the bottom of the descent is the creek, which the trail more or less follows up the canyon. The first part of the trail is marked by many bridge or log crossings over the creek, which can flow pretty high at times in the spring. This first section of the trail is popular for visitors of all sorts, including families.


This trail remains pretty kid friendly until about 1.8 miles up, at which point the trail becomes a bit confusing. If the water is low, the easiest way past this point is to simply walk through the shallow water or on top of the rocks.

The easiest way through this section is to follow the creek,
walking through the shallow water and/or stepping on the
larger stones here.

The marked trail in this spot actually ascends a very steep slick section of hill, heads along a more level section, then descends back down closer to the creek.

This picture probably doesn't show it's
character adequately, but this is the steep
path up around the water.

Path back down toward the creek,
marked by colored ribbon

The trail beyond this point is obviously less used, and it continues to become more overgrown as you go. Especially if you intend to go further than this, it is recommended you wear pants to avoid brushes with stinging nettle and the frequently reported rattlesnakes that are difficult to hear over the flow of the creek.


Head up as far as desired before turning back. Dogs and horses are permitted on this trail. Restrooms are available at the trailhead.

Directions

This trail is located in Bountiful, Utah, which is in Davis County. To get there from I-15, take Exit 317 and (continue straight on 500 W if you are coming from the north, then) turn east onto 400 North. Continue on this street toward the mountains and as the road curves around to become Bountiful Blvd and heads south. Keep going a short ways past the temple to find the trailhead parking on your left. GPS Coordinates: N40° 52.909' W111° 50.681'

July 15, 2021

Silver and Silver Glance Lakes

The Trail
This difficult trail 3.2 miles long (one way) with a 2,320 ft elevation change if you hike all the way to Silver Glance Lake. However, if you stop at Silver Lake, the trail is only a moderate 2.4 miles long (one way) with a 1400 foot elevation change. It starts at Silver Lake Flat and has a pretty steady gradual climb all the way up to Silver Lake, after which it becomes significantly steeper. The first roughly 1/3 of the trail heads through a forested area that is well shaded. After that the trail heads up past the tree cover into more open slopes.

Topographical Map for Silver & Silver Glance Lakes

Topographical Map for just Silver Lake

Graph of Elevation (for both lakes)

Trail in Google Earth

There are two trails branching from the same trailhead here. The one on the left goes to Silver Lake.

Head left at the trailhead

It will not take long to get to the first stream crossing, but some strategically placed logs create a little bridge over the water here.

First stream crossing

The second stream crossing is much wider and does not have any sort of bridge. This crossing is marked by a blue flag on the topographical map above. Later in the summer and in the fall, the water does not go over all the rocks, so they create stepping stones here across the stream. However, in the spring (as shown in the picture below), you will most likely get your feet wet since the water flows right over most of the rocks.

The second stream crossing where there is no bridge


There are some nice views of the surrounding mountains as you head up, as well as some great views of the valley after you get up higher.

View of mountains from the trail

View of the valley from the trail

Wild geraniums growing along the trail

As the trail winds around the final switchbacks up to Silver Lake, a waterfall flowing down from the lake is visible.

Waterfall plummeting down from Silver Lake

Another angle of the waterfall


After reaching the lake, there is a trail that circles its circumference. Part of this trail is shown in red in the topographical map above (but this section is not included in the trail length or elevation change information). When hiking this toward the later part of June, there was still snow along on of the banks of the lake, and other sections of this trail were very muddy, which would have made it difficult to go all the way around. The trail is drier and clearer later in the year.


If you want to go down to the water, the most easily accessible spots for this is found if you head south (left) upon reaching the lake. There is a sort of beach area here.

Beach-like area on southeast side of lake


You can also find the outlet on this side of the lake where the water pours over the edge of the cliff creating the waterfall seen from the trail.

Top of the waterfall

I am not a fisher, but a lot of people enjoy fishing from this lake as well. During the warmer months, it is popular for swimming and camping.

Most people stop at Silver Lake, but if you have time and energy, you can continue a steeper climb that gains about 900 feet in less than a mile to get to Silver Glance Lake. The trail continue up is on the east side of the lake near where the trail coming up to Silver Lake arrives at the lake.

Trail heading up to Silver Glance Lake

Soon before Silver Glance Lake, the trail flattens out into a small rocky meadow before continue up just a short ways more and reaching the lake. There is also a camp site here.

Rocky Meadow before reaching the lake

Silver Glance Lake with White Baldy in background


Campsite at Silver Glance Lake

Looking Toward Red Baldy

When you finish at the lake and head back, you will be further rewarded with stunning views of Silver Lake below and Mount Timpanogos in the distance.

This trail is open to dogs and horses, but not bicycles. Also, be aware that trailers are not allowed up the dirt road leading to the trailhead. There are vault toilets available at the trailhead.

Directions
This trail is located in Utah County up American Fork Canyon. To get to the trailhead from I-15, take Exit 184 and head east on Timpanogos Highway/UT-92. You will continue up this road into American Fork Canyon. There is a fee to go up the canyon and use this area. Turn left when you reach UT-144 in order to go toward Tibble Fork Reservoir. This turn is well marked on the road. Toward the east end of Tibble Fork Reservoir, turn left on the the road heading to the Granite Flat Campground. Before the pay station for the campground, there is a dirt road to the right. Turn up this road and drive about 3 miles to the trailhead parking area at the north end of Silver Lake Flat Reservoir. Note that this parking lot fills up on busy days, so you may have to park along the road or in the first parking area for the reservoir. Also note that trailers are not permitted on this dirt road. The dirt road is maintained though so that 4WD is not required to get up it, but it can still be narrow and bumpy. Drive up it carefully and you should be fine. GPS Coordinates: N40° 30.431' W111° 39.375'